Importing Snowflake modules Python as layers in AWS Lambda
AWS Lambda has revolutionized cloud computing, empowering developers to build scalable applications without server management. Snowflake, a powerful cloud-based data warehousing solution, excels in handling large datasets for data engineers and analysts.
When combining the strengths of AWS Lambda and Snowflake, developers can create dynamic data-driven applications that leverage the power of serverless computing with the robustness of Snowflake’s data warehousing capabilities. However, importing Snowflake modules directly into an AWS Lambda function can lead to increased complexity and deployment challenges.
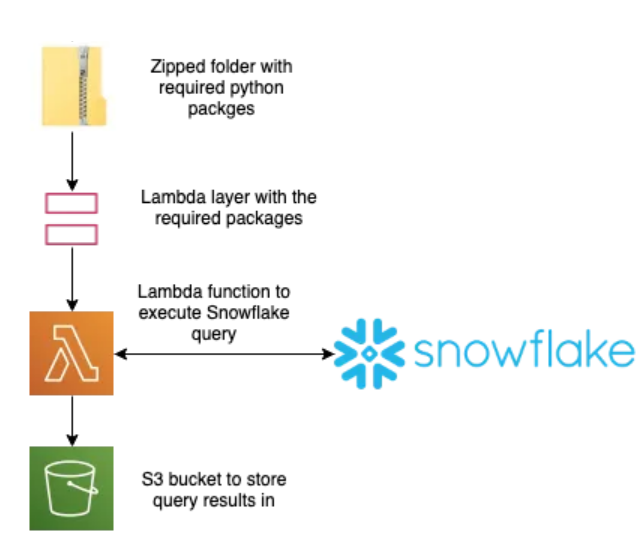
In this article, we will explore the process of importing Snowflake modules in Python as AWS Lambda Layers. We will guide you through the step-by-step procedure of creating and configuring Lambda Layers containing Snowflake dependencies. Moreover, we will demonstrate how to integrate these layers seamlessly into AWS Lambda functions, minimizing redundant code and streamlining the deployment process.
How Does Lambda Work?
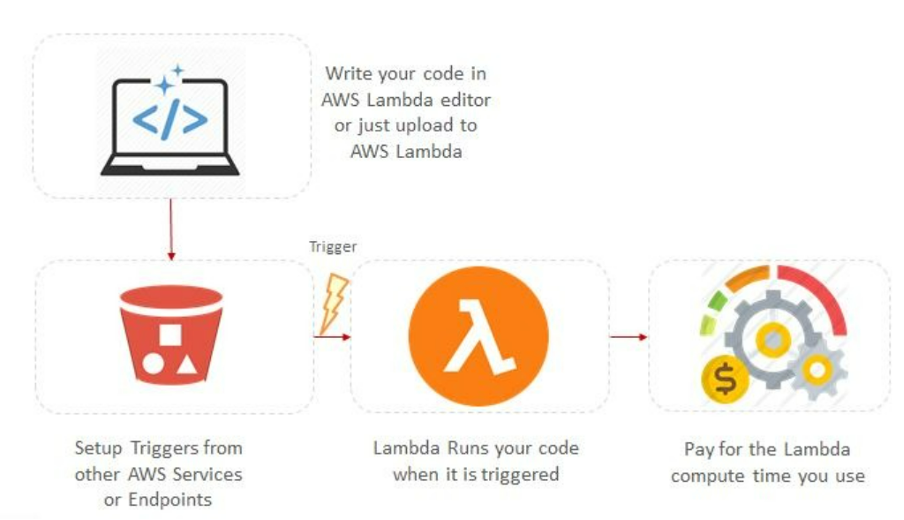
AWS Lambda is a serverless computing solution that allows you to submit code and set triggers. When an event occurs, Lambda creates an execution environment and executes your code in response. It handles scaling, resource allocation, and event-driven execution, allowing you to concentrate on writing code rather than server management. The outcome is returned, and the execution environment is cleared.
Benefits of Importing Snowflake Modules as Layers in AWS Lambda
Importing Snowflake modules as layers into AWS Lambda has various advantages, including:
- Simplified deployment: By importing Snowflake modules as layers, you may separate Snowflake-specific requirements from your Lambda function code. This streamlines the deployment procedure because the Snowflake modules are not included directly in the deployment package.
- Reduced deployment size: Snowflake modules can be huge, and putting them in every Lambda function deployment package can significantly boost their size. Layers allow you to reduce the size of your deployment packages, giving you faster deployment times and reduced expenses for storage.
- Flexible and reusable code: When Snowflake modules are imported as layers, users can reuse the same layer across several Lambda functions. This encourages modular and reusable programming, making it easier to maintain and upgrade Snowflake-specific functionality without duplicating code in each function.
- Faster cold starts: When a Lambda function is invoked for the first time or after a period of inactivity, it experiences a cold start. By separating the Snowflake-specific dependencies from the function’s code, importing Snowflake modules as layers can help reduce the cold start time. As a result, the function code may be loaded and executed more quickly, boosting overall performance.
- Version control and updates: Snowflake modules can be separately versioned and updated as layers. This allows you to manage and upgrade the Snowflake functionality independently of the Lambda function code. You may simply update the Snowflake layer to include bug fixes, security patches, or new features without modifying the Lambda function code.
Importing Snowflake modules Python as layers in AWS Lambda
There are various steps to setting up Snowflake and AWS Lambda.
1) We have to create a snowflake_connector_layer.zip file
Firstly, we have connected to the EC2 instance, you can go through the following steps:
- Click on EC2
- Click on launch instances
- After that close the popup window
- Click on instances
- Select the Ubuntu Server 20.04

- After that click the next
- Next: configure instance details
- Next: Add storage
- Next: Add tags
- Next: Configure Security Group
- Review and launch
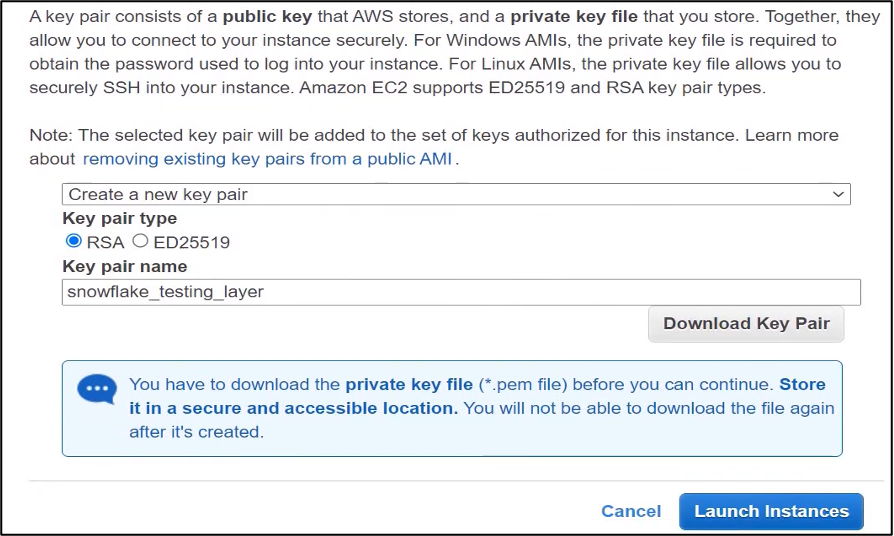
- After that launch Select any one key pair you want then give the key pair name “Snowflake_Testing_Layer”.
- Click on download key pair
- Click on Launch Instances.
- Your instances are now launching then click on the file “i-0c2889afff5487d4b”.

- After that click on the file.

- But the Instance ID status is pending.
Then how to change the Instance ID status is pending to running then follow the below steps
- Click on the Start button type PuTTYgen and open this software “Putty key generator”
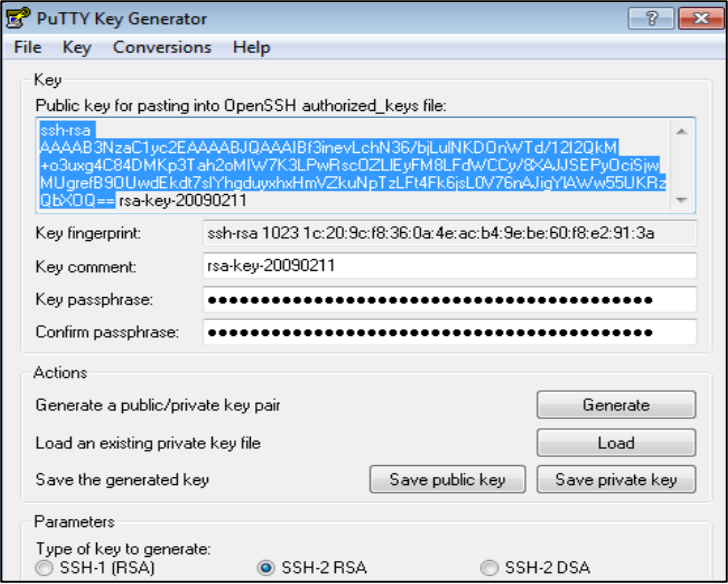
- Click on the load button
- Then load private key window is open in this window click on the download file and open the downloaded file i.e., “Snowflake_Testing_Layer”
- The ‘PuTTYgen Notice’ window is open click on ok
- Click on the save private key tab.
- The warning window is open click on the yes button.
- The ‘Save private key as’ window is open go to the desktop folder then the asset folder and create a file name as “lamdalayers”.
- Close the PuTTY Key generator window.

- The Instance ID status is changed to running
- Open the Instance ID file copy the path

- Then go to PuTTy software and paste the copied path into Hostname.
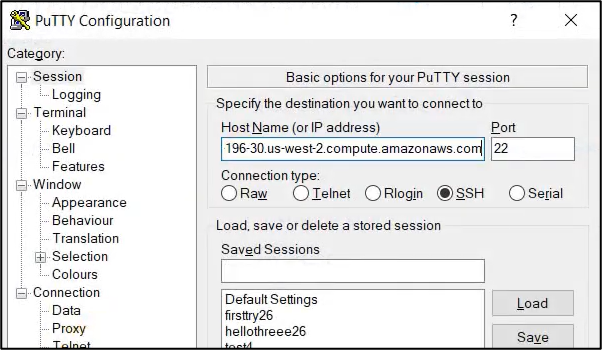
- Click on Hostname i.e., SSH >> Auth
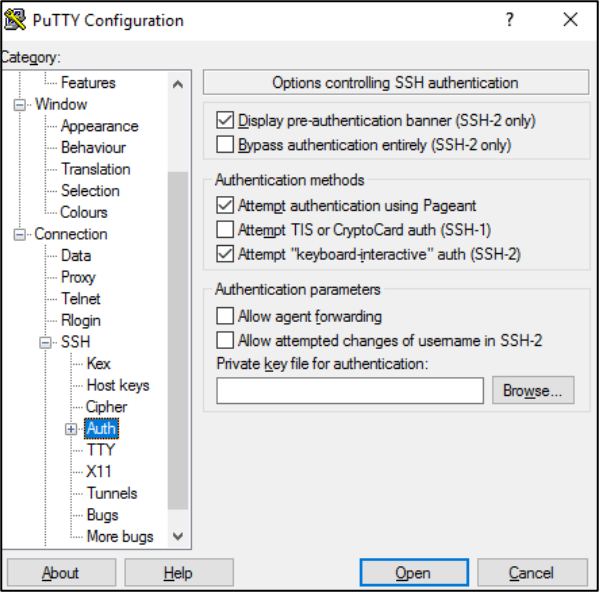
- Click the Browse tab open the created “lamdalayers” file and then click on the open button.

2) Once you are connected to the EC2 instance, you can go through the following steps
- Login as Ubuntu
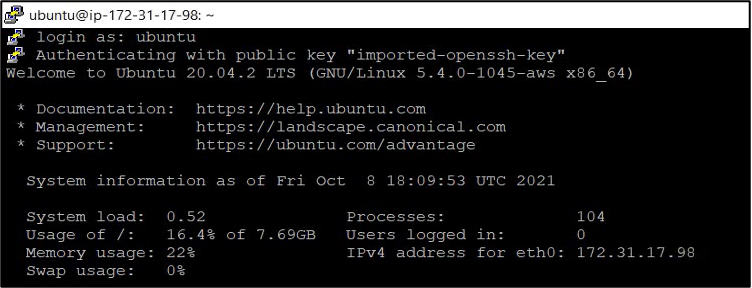
- The list of available packages and their versions is updated.
| sudo apt-get update |
- Creating the virtual environment for isolation purposes from the other environment
| update sudo apt install python3-virtualenv |
- Also, create another virtual environment i.e., snowflake_test
| virtualenv snowflake_test |
- Then activate that virtual environment
| source snowflake_test/bin/activate |
- Check the Python 3 Version
| python3 –version |
- Then install Python 3 pip package
| sudo apt install python3-pip |
- Upgrade the pip package
| python3 -m pip install –upgrade pip |
- Install
sudo apt-get install -y libssl-dev libffi-dev
- Install site-packages or site directories
mkdir -p lambda_layers/python/lib/python3.8/site-packages
- change the current directory run this command
cd lambda_layers/python/lib/python3.8/site-packages
- Install the requirements from a file named requirements_38.reqs, which is specified by the connector’s version v2.3.10 we are downloading all the dependencies on GitHub
pip install -r https://raw.githubusercontent.com/snowflakedb/snowflake-connector-python/v2.3.10/tested_requirements/requirements_38.reqs
- install snowflake connector
pip install snowflake-connector-python==2.3.10
- change the current directory
cd ~/lambda_layers
- install zip file
sudo apt install zip
- The zipped packages must be downloaded
zip -r snowflake_lambda_layer.zip *
3) Open WinSCP
- Go to the start button and type in the search box WinSCP
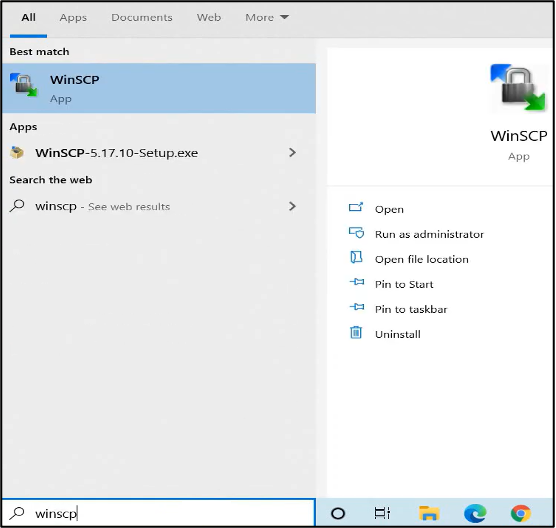
- Open it
- In the login window paste the hostname (Go to EC2 instance id and copy the DNS path)
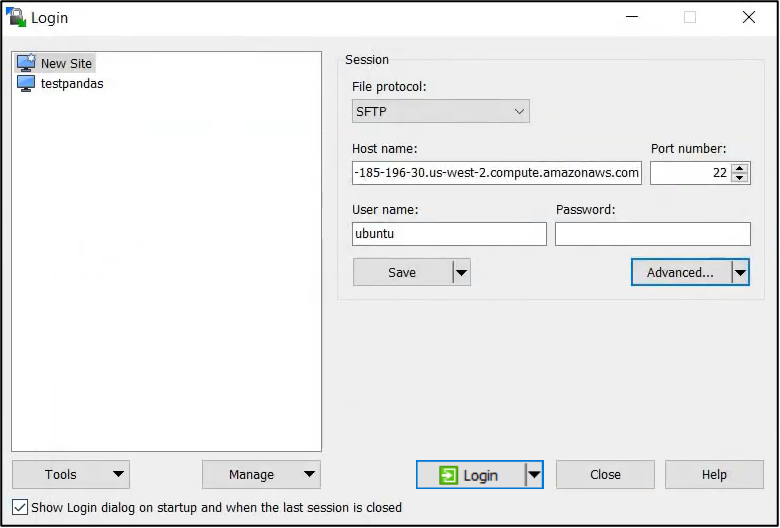
- For the password go to advanced
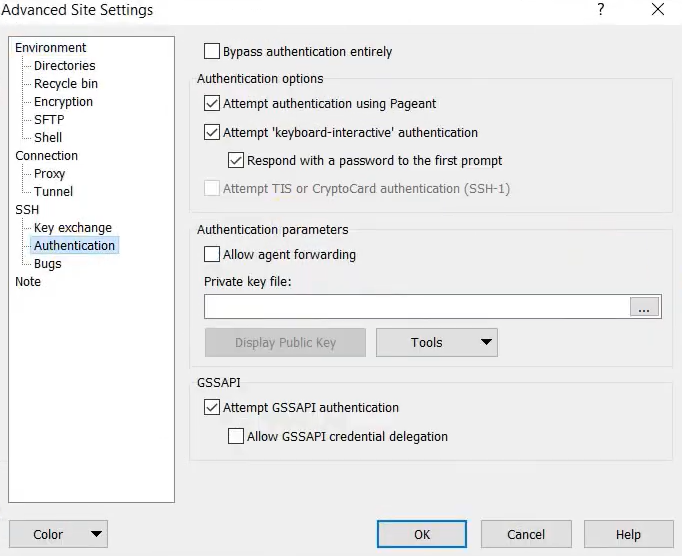
- Click on authentication >> Click on the three-dot in the private key file >> desktop >> Asset >> lamdalayers >> open >> ok >> login
- In the warning tab click on yes button after that

- On the right side of Ubuntu, click on lamda_layers here you see the snowflake_lambda_layer.zip file is created.
- On the left side desktop, click on asset. drag and drop the snowflake_lambda_layer.zip file in the asset folder.
=============================
4) If your zip file is greater than 10 Mb then follow these steps
- Go to AWS services, Click on S3.
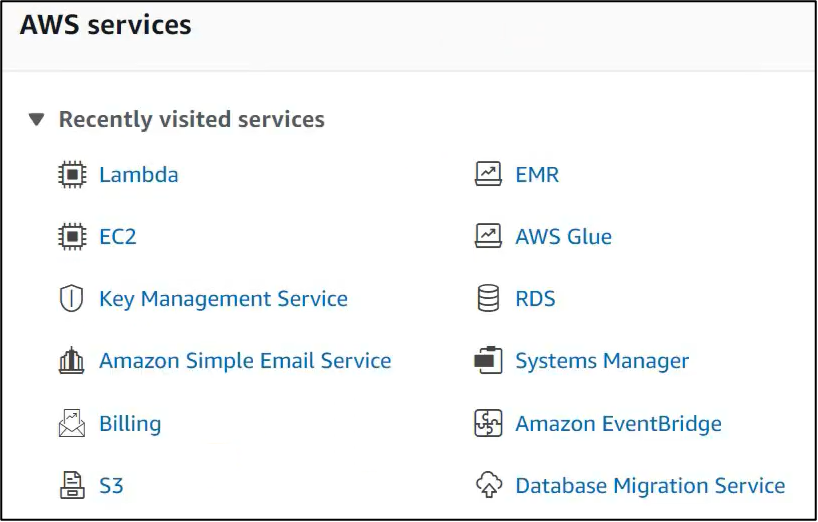
- Click on create bucket.

- Give the bucket name.
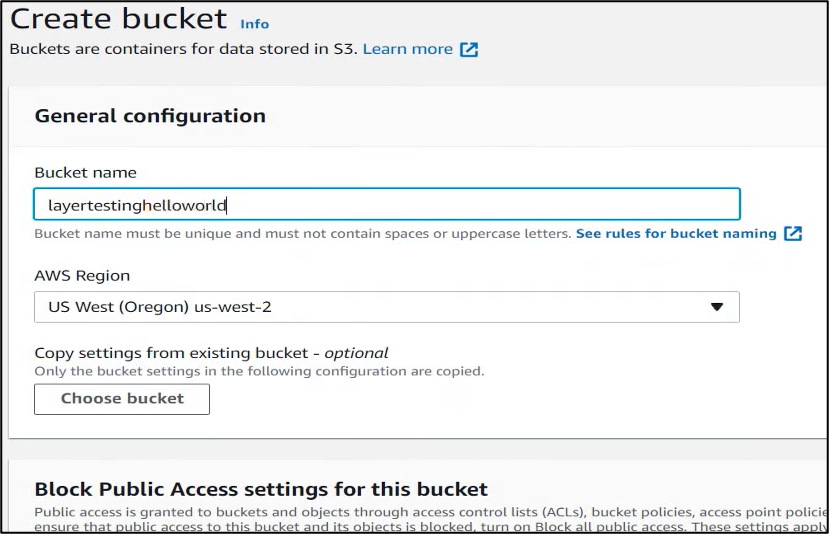
- After that scroll down and click on Create bucket.
- Click on the search tab and type your bucket name then search.

- Click on the layertestinghelloworld bucket name
- Click on Upload namaste button

- Here we can add your zip file
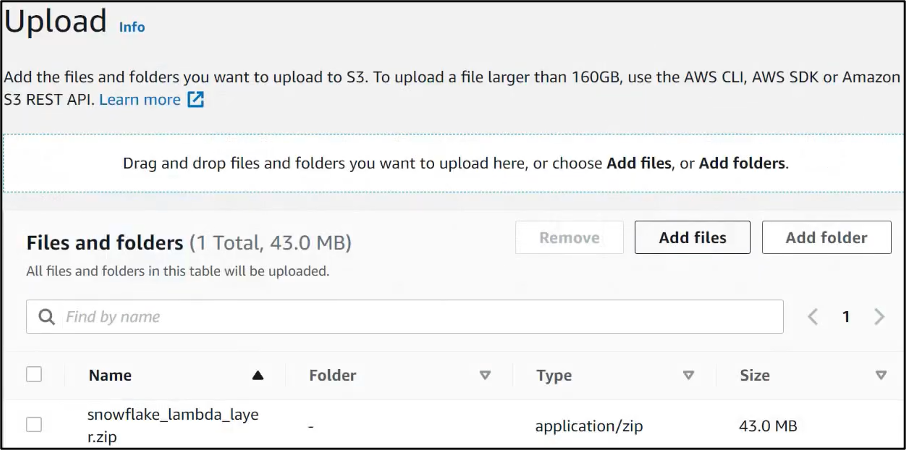
- After that scroll down and click on the upload button
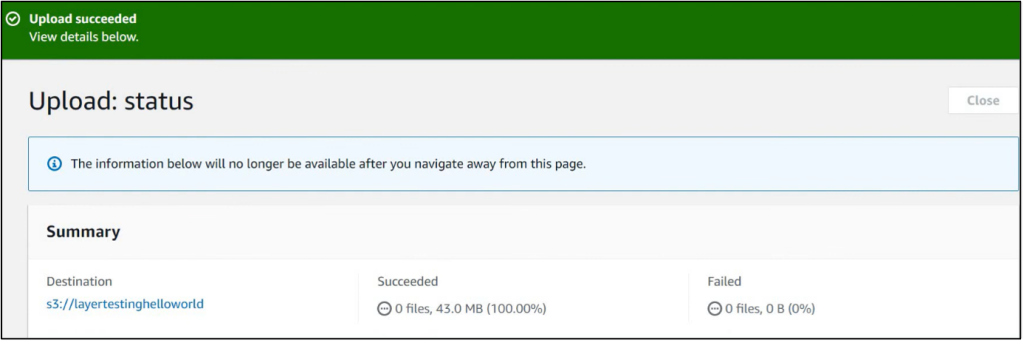
- Your zip file is uploaded successfully.
5) Creating the Layer
- In the AWS Management Console, click on AWS Lambda
- Click on layers
- Click on a Create layer

- Give the name and upload a zip file if your zip file is less than 10 Mb then click on upload a .zip file otherwise click on upload a file from Amazon S3. If you click on upload a file from Amazon S3 then paste here created bucket link.
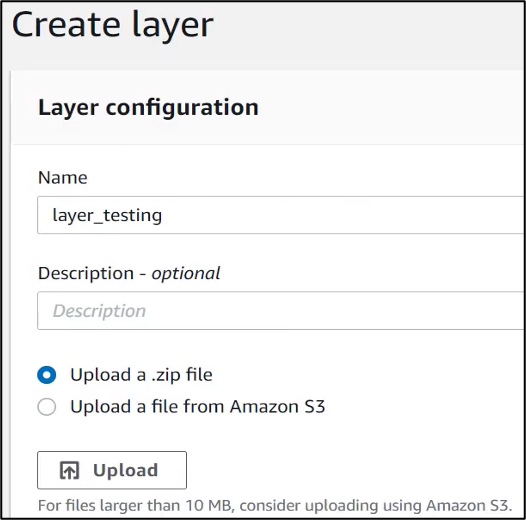
- Then scroll down and create.
- So, created layer layer_testing is successful.
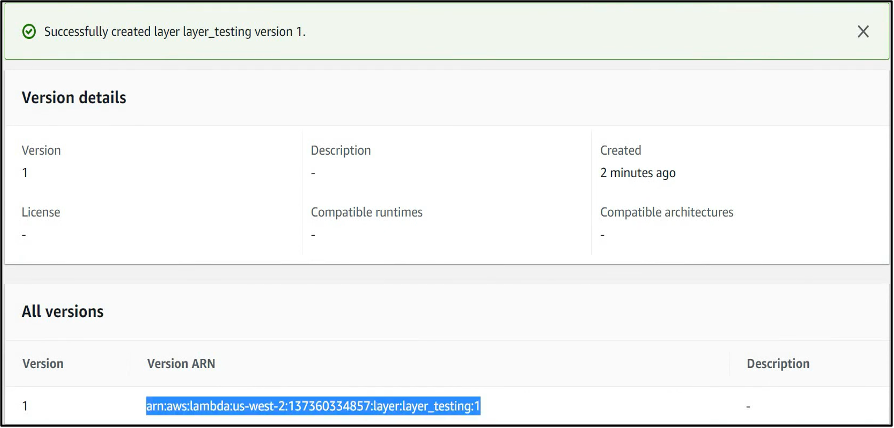
6) Combine everything to create your own AWS Lambda function that includes Snowflake functionality.
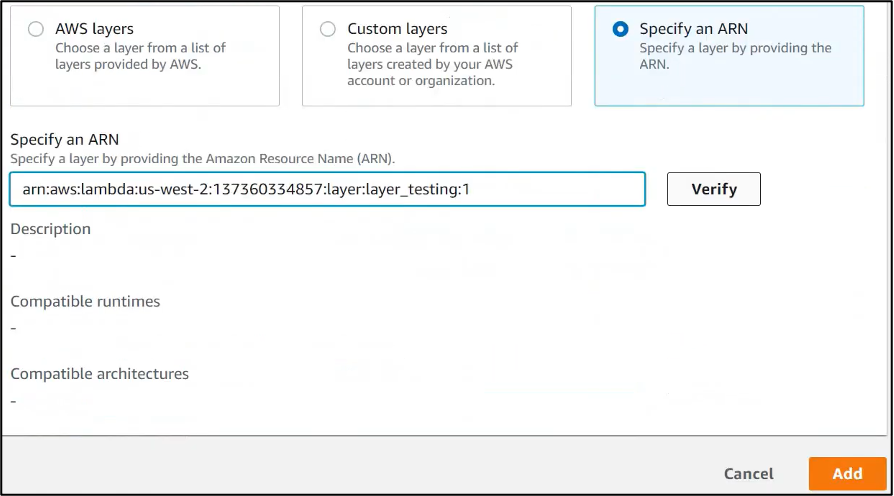
- Go to AWS Lambda >> Click Layers >> Add a layer >> Choose a layer i.e., specify an ARN >> Paste the ARN version you copied >> Verify >> Add
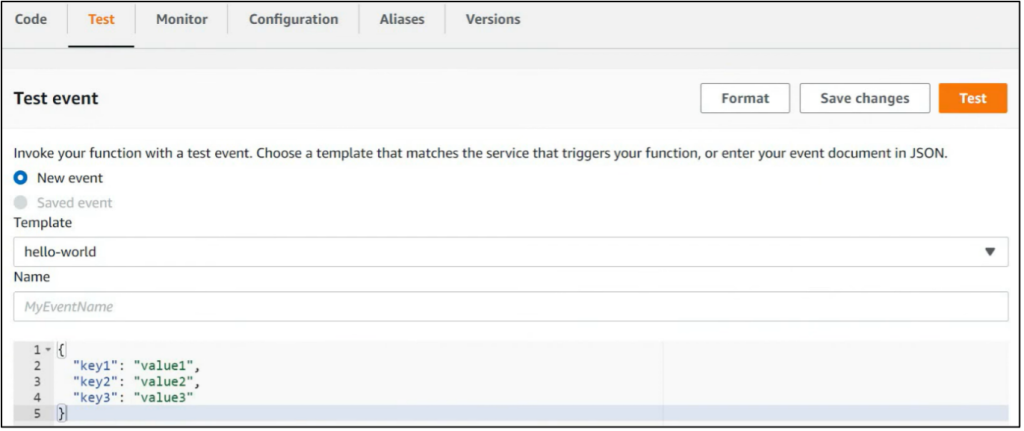
- Click on test >> test
- After successfully

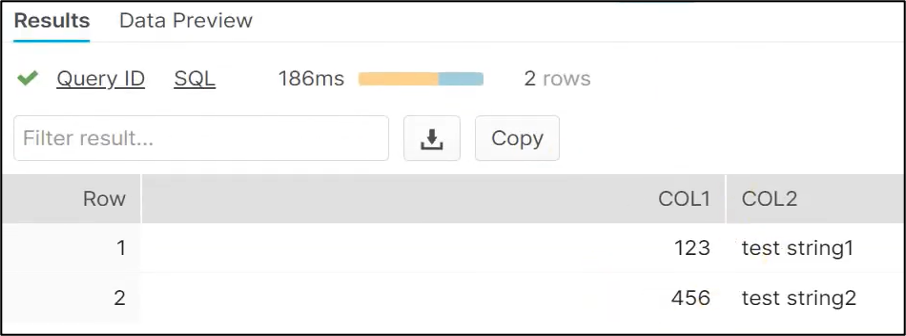
- Go to snowflake >> worksheets >> Write your query and run

- After running successfully, you can check your data.
Why do we use the Snowflake ZIP file in AWS Lambda?
The use of a Snowflake ZIP file in AWS Lambda often refers to creating an installation package that includes the Snowflake connector or client library as well as the Lambda function code. After that, the ZIP file is submitted to AWS Lambda for deployment.
Here are some of the reasons you might want to use a Snowflake ZIP file in AWS Lambda:
Snowflake Integration: If your Lambda function has to interface with a Snowflake data warehouse, you’ll require the Snowflake connector or client library to connect, conduct queries, and retrieve data. Including the Snowflake ZIP file in your Lambda deployment package ensures that the necessary Snowflake functionality is available to your Lambda function.
Offline Development: By including the Snowflake ZIP file in your Lambda deployment package, you can build and test your Lambda function without needing to connect to Snowflake. This is very useful if working offline or testing your Lambda function in a situation where direct access to Snowflake is not possible.
Unique Snowflake Configurations: The Snowflake ZIP file may contain unique Snowflake installation configurations. Connection parameters, authentication information, and other Snowflake-specific settings are all included. You can verify that your Lambda function connects to the correct Snowflake instance and utilizes the desired parameters by adding the information in the ZIP file.
Reduced Dependency Management: By including the Snowflake ZIP file in your Lambda deployment package, you simplify dependency management. You do not need to manage and install the Snowflake connector or client library individually in your Lambda environment. The ZIP file isolates the Snowflake functionality, making it easy to install and manage.
Disadvantages
While integrating Snowflake modules as layers in AWS Lambda functions has various benefits, there are also some drawbacks to consider:
- Increased Complexity: Importing Snowflake modules as layers adds another layer of complexity to your Lambda function configuration. It necessitates managing and maintaining the Snowflake layer separately from your function code, which adds complexity and possible failure spots.
- Versions Challenges: While independent updates and versions of Snowflake modules can be beneficial, they may also create difficulties. Version compatibility between the Snowflake layer and the Lambda function code might be more difficult to manage and coordinate, especially when distinct functions depend on various versions of the Snowflake layer.
- Lack of Flexibility: Importing Snowflake modules as layers may restrict your ability to use multiple versions or custom configurations of Snowflake modules. If you need to utilize a specific version or set Snowflake components in a specific way, this layer’s technique may be more difficult to implement.
- Increased Resource Usage: By importing Snowflake modules as layers, you are effectively loading and initializing the Snowflake functionality for each Lambda function invocation, even if the function does not use all of the Snowflake modules features. This may result in somewhat higher resource utilization and may affect the overall performance of your Lambda functions.
- Dependency on External Layer: When you import Snowflake modules as a layer, your Lambda functions become to depend on the Snowflake layer’s stability and compatibility. If there are any problems with the layer or if it becomes unavailable, your Lambda functions may not function properly.
Features
- Simplified Deployment: Separate Snowflake dependencies from your function code for easier installation.
- Reduced Package Size: Importing Snowflake modules as layers minimizes the size of the deployment package, allowing for faster deployments and lower storage costs.
- Code Reusability: Snowflake functionality can be shared across multiple Lambda functions without duplicating code, promoting code reusability and simplifying maintenance.
- Faster Cold Starts: AWS Lambda can load and initialize the layer separately, resulting in speedier cold starts.
- Simplified Dependency Management: Snowflake dependencies are managed individually as a layer, simplifying maintenance and installation.
- Independent Versioning and upgrades: Snowflake modules can be versioned and updated independently, allowing for easier upgrades and bug fixes without changing the Lambda function.
- Enhanced Isolation and Security: Snowflake modules as layers give an additional layer of isolation and security, ensuring that Snowflake-specific functionality is separated and managed.
FAQs on Importing Snowflake Modules Python as Layers in AWS Lambda
Question: Is it possible to use multiple Snowflake layers inside the same AWS Lambda function?
Answer: No, AWS Lambda only allows one layer per function at the moment. But many Snowflake modules may be included within a single Snowflake layer.
Question: How do I import Python modules into AWS Lambda?
Answer: To import Python modules into AWS Lambda, you need to include them in your deployment package. Bundling the necessary modules with your Lambda function code and any additional dependencies, and uploading the package to AWS Lambda, is one way to accomplish this. Once uploaded, you can import the modules in your Lambda function code using the standard Python import statement.
Question: Are there any extra costs associated with importing Snowflake modules as layers in AWS Lambda?
Answer: Yes, importing Snowflake modules as layers in AWS Lambda incurs additional costs for storage and data transfer. Ensure you consider the cost implications when using Snowflake modules as layers.
Question: How do you add a layer to a lambda function in Python?
Answer: To add a layer to a Lambda function in Python, you have to build or import the layer package, which contains the required code or libraries. The layer package may be uploaded to AWS Lambda once it has been created. Once there, go to the Layers portion of the AWS Lambda console where you can either build a new layer or choose an existing one.
The layer should be attached to your Lambda function and given a name and optional description. Your Lambda function now includes the extra layer when you save the changes. This allows your function to access the code and libraries stored in the layer, improving its value.
Question: Can I use Snowflake modules as layers in AWS Lambda to interact with other AWS services?
Answer: Yes, you can use Snowflake modules as layers in AWS Lambda to communicate with other AWS services. For smooth interaction with multiple AWS services, including S3 and Glue, Snowflake offers connectors and libraries.
Question: What is the best practice for AWS Lambda database connection in Python?
Answer: Some best practices for AWS Lambda database connections in Python involve using network sharing for greater efficiency and implementing correct error handling and retry logic for durability.
Conclusion
In this article, we have provided the procedure for importing Snowflake modules Python as layers in AWS Lambda. Also, we have discussed on Developers can separate Snowflake dependencies, such as the Snowflake Connector, from the core Lambda function by using layers, which simplifies code management and reduces deployment package size. This method boosts performance by allowing the function to concentrate on business logic. However, certain drawbacks such as greater implementation complexity and associated storage costs must be considered.
Overall, using Snowflake modules as layers in AWS Lambda provides a great approach for developing scalable and efficient serverless apps that connect smoothly with Snowflake’s data warehouse features.


